Introduction
Ansible is a popular configuration automation tool that helps to automate infrastructure processes without exposing credentials. The Ansible integration helps IT administrators and process analysts to create Ansible playbooks to automate the administration tasks and commands. Integrating Ansible with OpsRamp helps to do agentless automation tasks for process workflows.
The Ansible integration is available only at the client level.
Target users: Client administrators and process analysts
Why use Ansible integration?
The Ansible integration enables the following:
- Automating workflows using SSH without installing agents on all the remote systems.
- Performing auto-remediation actions.
- Scheduling tasks.
- Executing an ad hoc workflow.
Integrating Ansible with OpsRamp
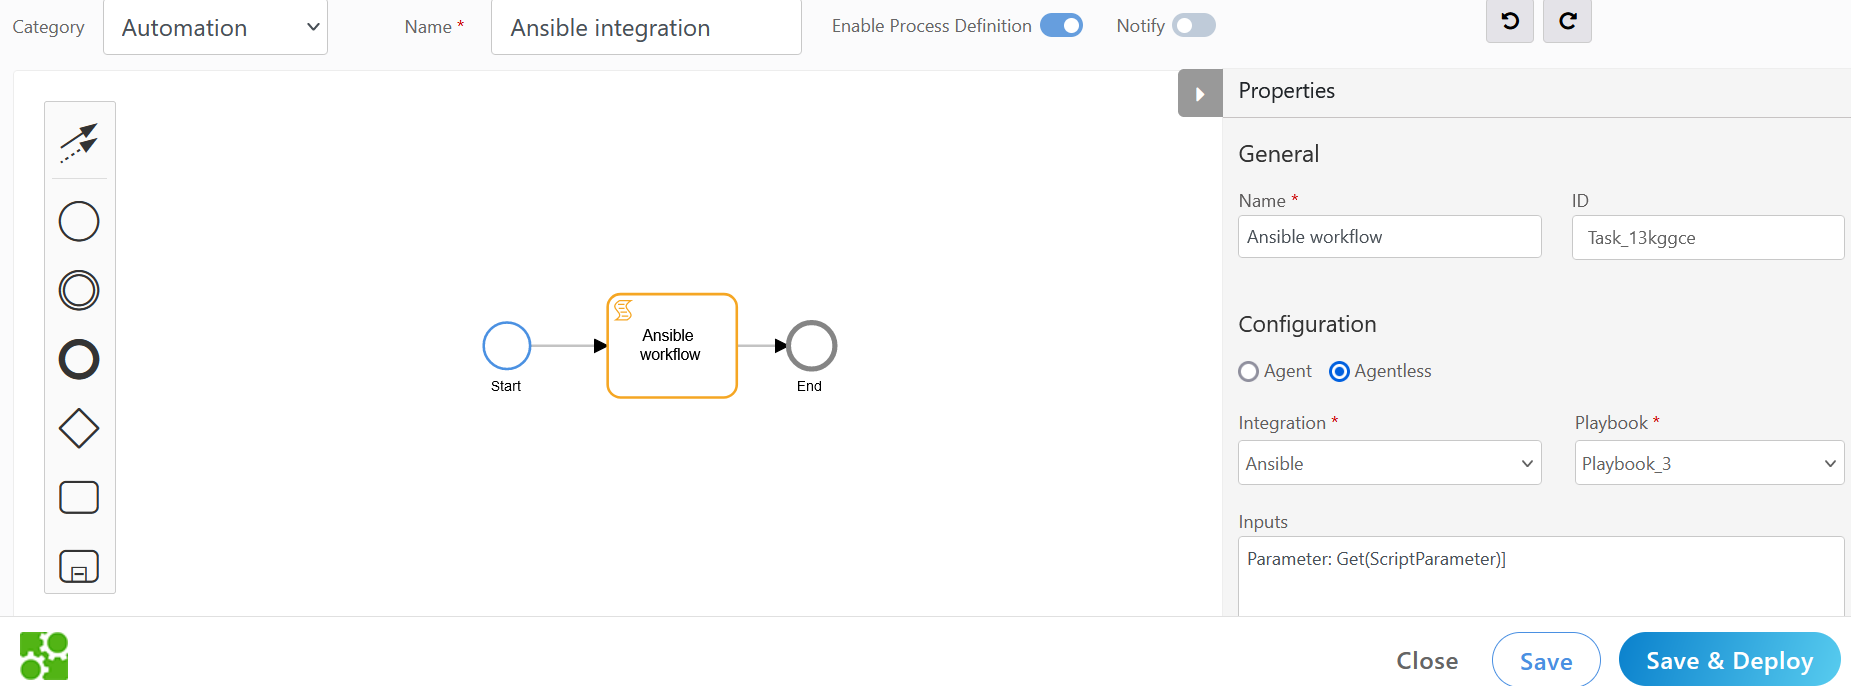
The Ansible integration involves installing Ansible and creating playbooks. One Ansible integration can have multiple playbooks. Every playbook represents an automation script in the YAML format. The playbook is assigned to a process automation workflow to execute the related automation tasks.
Prerequisites
- Install Ansible on one of the servers in a specific environment (Ansible Control Node).
- Verify if the target managed nodes and hosts are accessible through SSH with the Ansible Control Node.
- Copy the full path of each Ansible script with the file name to create a playbook.
- Allow OpsRamp URL in the Ansible server to download all the latest Agent packages. To download, go to the OpsRamp Console and navigate to Setup > Downloads > Agent.
Sudopermissions are required for the device user.- Navigate to Infrastructure > Resources and verify if the Ansible Control Node is visible and active.
Configure Ansible integration
Install the Ansible integration directly from the OpsRamp console. Before starting the installation, verify if the host name and Ansible server are visible on the Infrastructure > Resources page.
Click All Clients, select a client.
Click Setup > Account.
Select the Integrations tile.
The Installed Integrations screen is displayed, with all the installed applications. Click + ADD on the Installed Integrations page.
If you do not have any installed applications, you will be navigated to the Available Integrations page. The Available Integrations page displays all the available applications along with the newly created application with the version.
Note: Search for the application using the search option available. Alternatively, use the All Categories option to search.Click +Add on the Ansible tile.
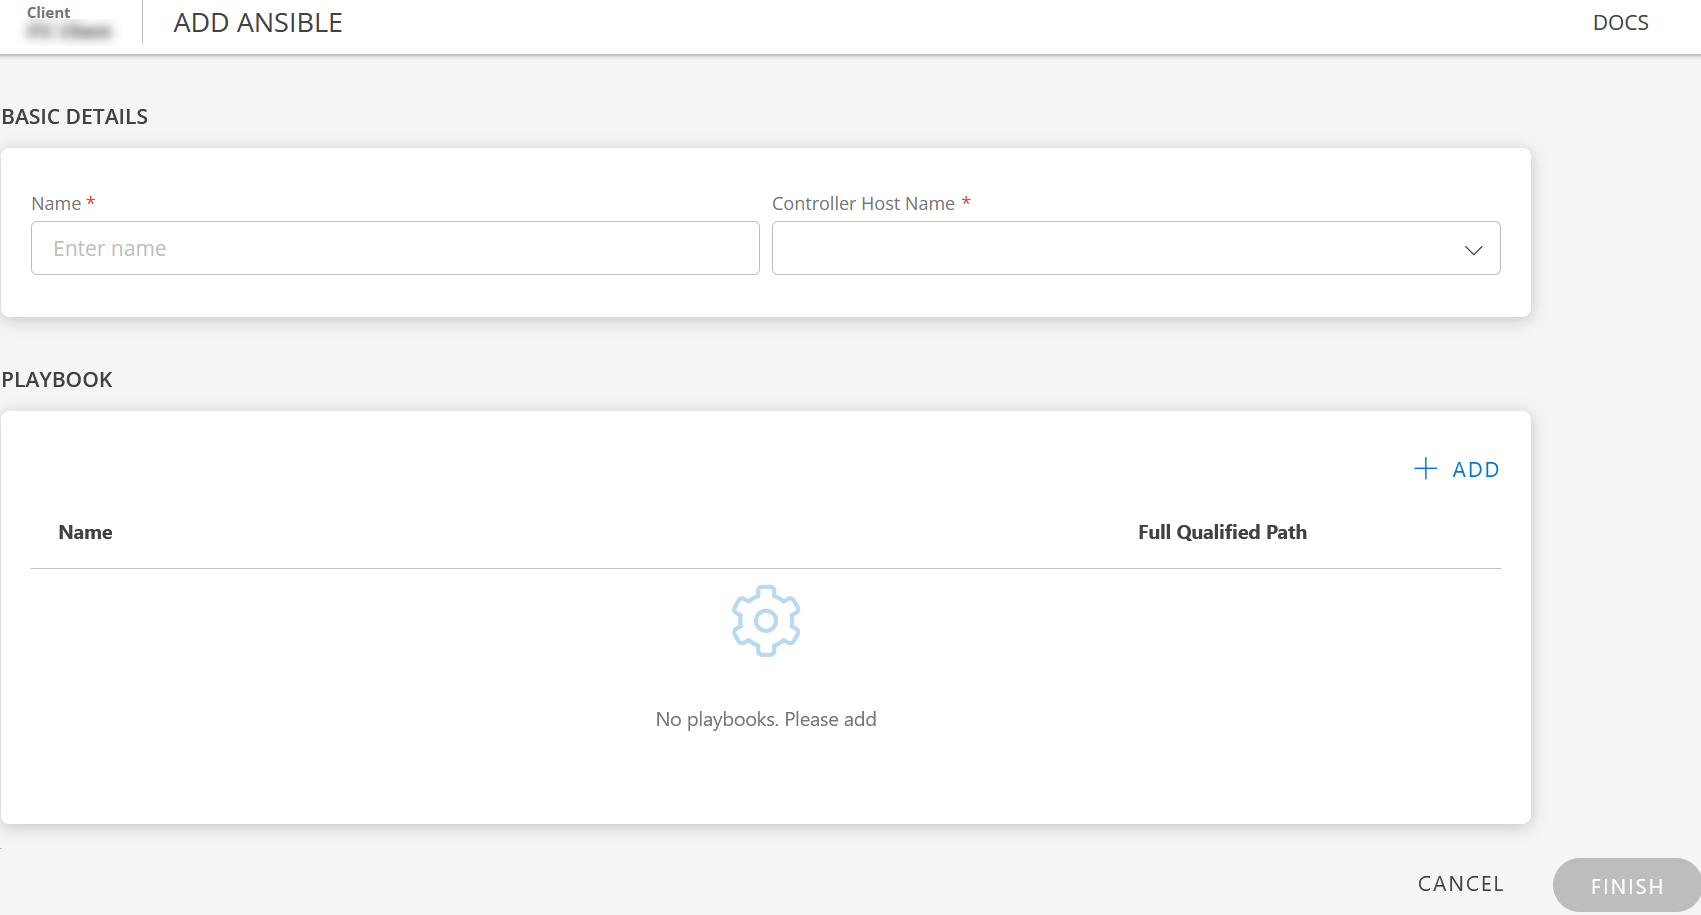
BASIC DETAILS: Enter the following information:


| Field Name | Field Type | Description |
|---|---|---|
| Name | String | Enter a name for the integration. Example: Ansible playbook automation. |
| Controller Host Name | Dropdown | Select a name from the available options. The drop-down list displays Ansible Control nodes configured with an OpsRamp agent. |
Controller Host Node Not Appearing
Problem:
You have installed the Agent on your Linux (Ansible) server, but during the Ansible integration setup, the device does not appear in the Controller Host Node dropdown.
Solution:
If the device is missing from the Controller Host Node dropdown, create an Asset Information–type job for the Linux server by navigating to: Automation → Jobs → Create Job.
Once the job completes successfully and OpsRamp updates the device details, the Ansible Controller Node will now visible in the Controller Host Node dropdown.
- Add Playbooks: You can add one or more playbooks to automate specific tasks.
Each playbook can execute only one automation script.
Example: Run a script to retrieve ipconfig details.
- Prerequisite Before creating a playbook, ensure you have the script name and the complete script path available.
- To add a playbook
- In the PLAYBOOK section, click ADD.
- In the Add Playbook dialog box, provide the required playbook details.
| Field Name | Field Type | Description |
|---|---|---|
| Name | String | Provide a name for the playbook. Example: Check Server. |
| Full Qualified Path | String | Enter the complete path of the script. |
| input(Optional) | String | Enter more parameters for the script. |
- Click ADD PLAYBOOK.
The playbook is added and displayed in the PLAYBOOK section.
- An integration can have one or more playbooks. To add more playbooks, click ADD.
- To update an existing playbook, click the menu (three dots) icon and select Edit.
- To delete a playbook, click the menu (three dots) icon and select Remove.
- Click FINISH.
The playbook added with the installed integration is ready to use in a process workflow.
Actions on Integration
You can perform actions like Export, Edit, and Uninstall on the integration.
- See Actions on Integration for more information.
Using Ansible integration
The installed Ansible integration is used while creating business process workflows. See Getting Started with Process Definition for more information.
Note: Verify if the installed integration is active.